Perfect Pumpkin Cheesecake Bars: The Ultimate Fall Gathering Dessert
As autumn leaves begin to paint the landscape in hues of red and gold, a familiar craving emerges – the desire for warm, comforting flavors that encapsulate the spirit of the season. And when it comes to fall desserts, nothing quite hits the spot like the luxurious blend of creamy cheesecake and aromatic pumpkin spice. Enter
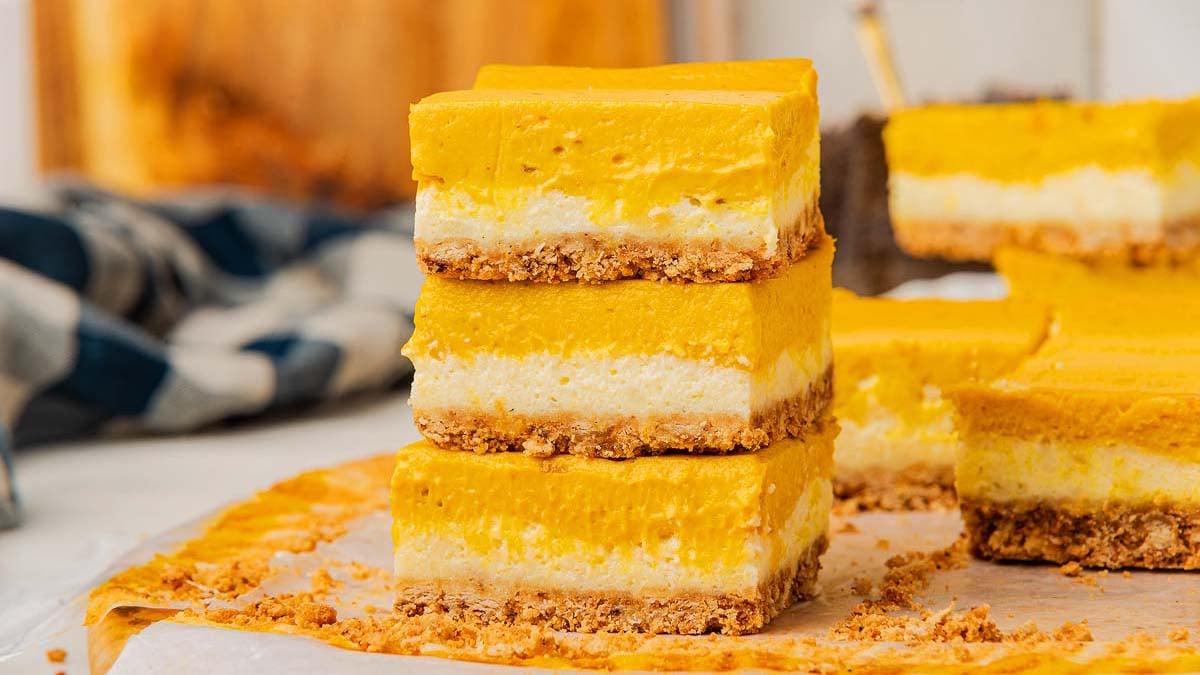
pumpkin cheesecake bars, the quintessential treat that offers all the rich indulgence of a classic pumpkin cheesecake in an effortlessly shareable form. Smooth, unbelievably rich, and infused with those signature warm spices, these bars are not just a dessert; they're a statement, a promise of cozy gatherings and delightful moments.
Forget the complexities of traditional cheesecakes; these bars deliver pure autumn bliss without the fuss. Imagine a buttery graham cracker crust, a velvety pumpkin filling that melts in your mouth, and subtle notes of cinnamon, nutmeg, and vanilla dancing on your palate. It's an irresistible combination, guaranteed to make them the star of any Friendsgiving, potluck, or holiday table. If you’re looking to impress with a homemade dessert that looks bakery-made but is surprisingly simple, read on to discover why
pumpkin cheesecake bars are about to become your new fall favorite.
What Makes Pumpkin Cheesecake Bars So Special?
While a full-sized pumpkin cheesecake certainly has its charm, pumpkin cheesecake bars offer a range of advantages that make them a superior choice for many occasions. They embody the essence of easy elegance, combining convenience with undeniable deliciousness.
- Unmatched Texture Perfection: Each bite delivers a harmonious blend of textures – the crisp, buttery crunch of the crust gives way to a smooth, creamy, melt-in-your-mouth filling. It's a delightful contrast that keeps you coming back for more.
- Effortless Preparation: Say goodbye to stressful water baths, tricky springform pans, and the anxiety of cracks. These bars are designed for simplicity, baked in a standard rectangular pan with straightforward steps that even novice bakers can master. For a comprehensive guide to their ease, explore our Easy Pumpkin Cheesecake Bars Recipe: Your Fall Dessert Guide.
- Seasonal Flavor Extravaganza: Packed with the quintessential flavors of fall – warm pumpkin, cinnamon, nutmeg, and cloves – they evoke a sense of coziness and nostalgia. They're the edible embodiment of autumn.
- Perfect for Sharing: Unlike a round cheesecake that requires careful slicing, bars are inherently portioned. They're ideal for parties, potlucks, bake sales, or even thoughtful gifts, offering easy grab-and-go convenience.
- Time-Saving Indulgence: You get all the luxurious richness and complex flavor profile of a traditional pumpkin cheesecake in a fraction of the baking and cooling time. Less time in the kitchen means more time enjoying your guests!
- Visually Stunning Presentation: With their golden-brown crust, vibrant orange filling, and often a swirl of whipped cream or a drizzle of caramel, these bars are a feast for the eyes as much as the palate. They look incredibly professional, fooling everyone into thinking you spent hours perfecting them.
- Freezer-Friendly Convenience: Prepare them in advance and store them in the freezer, allowing you to enjoy a taste of fall anytime inspiration strikes, without any compromise on flavor or texture. This makes them perfect for holiday meal prep.
Decoding the Perfect Pumpkin Cheesecake Bar: Ingredients You'll Need
The magic of these bars lies in a carefully selected list of ingredients that balance richness, spice, and sweetness. Quality ingredients are key to achieving that irresistible creamy texture and robust flavor.
For the Buttery Crust:
- Graham Cracker Crumbs: The classic choice for a reason, providing a subtly sweet and crunchy base. For a delightful twist, consider using crushed digestive biscuits for a slightly less sweet, more buttery profile, or even gingersnap cookies, which introduce an extra layer of warm spice that perfectly complements the pumpkin.
- Granulated Sugar: Just enough to enhance the sweetness of the crackers and help with caramelization.
- Unsalted Butter, Melted: This acts as the binder, bringing the crumbs together to form a firm, cohesive crust.
For the Velvety Cheesecake Filling:
- Cream Cheese, Softened: The cornerstone of any great cheesecake. It's crucial that your cream cheese is at room temperature to ensure a lump-free, super-smooth filling.
- Brown Sugar (Packed): Adds a deeper, more molasses-rich sweetness compared to white sugar, complementing the pumpkin beautifully.
- Large Eggs: Act as a binder and add richness, helping the cheesecake set to that perfect creamy consistency. Ensure they are at room temperature as well.
- Pure Vanilla Extract: A splash of high-quality vanilla enhances all the other flavors, adding complexity and warmth.
- Pumpkin Purée (NOT Pumpkin Pie Filling): This distinction is critical! Pumpkin purée is simply cooked and mashed pumpkin, while pumpkin pie filling contains added spices and sweeteners. Using purée allows you to control the spice levels precisely.
- Ground Cinnamon, Nutmeg, & Cloves: The holy trinity of fall spices. These warm spices are what give the pumpkin filling its iconic flavor. You can adjust the ratios to your personal preference, or even add a pinch of allspice or ginger for extra depth.
- All-Purpose Flour: A small amount helps stabilize the cheesecake filling, preventing cracks and ensuring a smooth set.
- Pinch of Salt: Essential for balancing the sweetness and enhancing all the other flavors, making the pumpkin and spice notes truly pop.
Optional Toppings for a Flourish:
- Whipped Cream: A dollop of freshly whipped cream adds a light, airy contrast.
- Caramel Drizzle or Chopped Pecans: For extra indulgence and a beautiful presentation.
Step-by-Step Guide to Baking Bliss
Crafting these perfect pumpkin cheesecake bars is a straightforward process, broken down into manageable steps. Precision and patience are your best tools!
Step 1: Prep the Oven and Pan
Preheat your oven to a steady
325°F (165°C). This moderate temperature is key to baking cheesecake without overcooking. Line a 9x9-inch or 8x8-inch baking pan with parchment paper, leaving generous overhangs on the sides. These "handles" will make lifting the entire cooled cheesecake slab out of the pan incredibly easy.
Step 2: Construct the Dreamy Crust
In a medium mixing bowl, combine your graham cracker crumbs, granulated sugar, and melted butter. Stir thoroughly until the crumbs are uniformly coated and resemble damp sand. This ensures a consistent texture throughout the crust. Press this mixture firmly and evenly into the bottom of your prepared baking pan. Use the back of a spoon or the flat bottom of a glass to really compact it; a firm crust is a good crust! Bake for
8-10 minutes until lightly golden and fragrant. Remove from the oven and set aside to cool slightly while you prepare the filling.
Step 3: Whip Up the Velvety Cheesecake Filling
In a large mixing bowl, using an electric mixer (either stand mixer with a paddle attachment or hand mixer), beat the softened cream cheese on medium speed for about 2-3 minutes. It should be utterly smooth and creamy, with no lumps in sight. This initial beating is vital for a silky-smooth final product. Next, add the packed brown sugar and continue to beat until well combined and lightened, about 1-2 minutes more. Scrape down the sides of the bowl as needed to ensure everything is incorporated.
Step 4: Incorporate the Essentials Gently
Add the eggs, one at a time, mixing on low speed just until each egg is incorporated before adding the next. Overmixing at this stage can incorporate too much air, which can lead to cracks in your cheesecake. Stir in the pure vanilla extract, pumpkin purée, ground cinnamon, nutmeg, cloves, all-purpose flour, and a pinch of salt. Mix on low speed just until everything is combined and the filling is smooth. Again, avoid overmixing.
Step 5: Bake to Golden Perfection
Carefully pour the creamy pumpkin cheesecake filling over the slightly cooled, pre-baked crust. Gently spread it out with a spatula to create an even layer. Bake in your preheated oven for approximately
40-50 minutes. The bars are done when the edges are set and lightly golden, but the center still has a slight, very subtle jiggle when gently shaken. This slight jiggle indicates perfect doneness; it will set completely as it cools.
Step 6: The Art of Cooling and Chilling
Remove the pan from the oven and let the bars cool completely on a wire rack at room temperature. This gradual cooling helps prevent cracking. Once cooled to room temperature, transfer the pan to the refrigerator and chill for a minimum of
4 hours, or ideally, overnight. Chilling is crucial for the bars to firm up properly, making them easy to slice cleanly.
Step 7: Slice, Garnish, and Serve
Once thoroughly chilled, use the parchment paper overhangs to carefully lift the entire slab of pumpkin cheesecake out of the pan and onto a cutting board. Use a sharp knife, wiping it clean between each cut, to slice the cheesecake into uniform bars. For the ultimate presentation and flavor, garnish each bar with a dollop of freshly whipped cream, a drizzle of warm caramel, or a sprinkle of chopped pecans. For more detailed instructions and helpful insights into achieving the perfect texture, be sure to check out our guide to
Creamy Pumpkin Cheesecake Bars: Classic Taste, Less Time & Effort.
Elevate Your Bars: Tips for Perfection and Presentation
While the recipe itself is straightforward, a few expert tips can take your pumpkin cheesecake bars from great to absolutely unforgettable.
- Room Temperature is Key: Ensure your cream cheese and eggs are at room temperature. Cold ingredients don't emulsify properly, leading to a lumpy filling. Take them out of the fridge at least an hour before you plan to bake.
- Don't Overmix the Filling: Once you add the eggs, mix only until just combined. Overmixing incorporates too much air, which expands during baking and then collapses, potentially causing cracks in your cheesecake.
- Customize Your Crust: Experiment beyond graham crackers! Gingersnaps, as mentioned, are fantastic. Crushed shortbread cookies or even chocolate sandwich cookies can offer intriguing flavor profiles. A pinch of cinnamon or pumpkin pie spice added to the graham cracker crust mixture enhances the overall fall flavor.
- Perfect Your Spices: While the given blend is excellent, feel free to adjust. Love ginger? Add a little more. Prefer a stronger clove kick? Go for it! You can even make your own pumpkin pie spice mix from scratch for maximum freshness and aroma.
- Patience with Cooling and Chilling: This step cannot be rushed. Proper cooling on the counter, followed by thorough chilling in the refrigerator, is essential for a firm set, clean slices, and optimal flavor development.
- Clean Cuts Every Time: For neat, professional-looking bars, use a sharp, thin-bladed knife. For extra clean cuts, run the knife under hot water and wipe it dry between each slice.
- Creative Garnishes: Beyond whipped cream and caramel, consider a dusting of cinnamon, a sprinkle of toasted pumpkin seeds, candied cranberries, or even a light grating of fresh nutmeg.
- Storage Savvy: Store leftover pumpkin cheesecake bars in an airtight container in the refrigerator for up to 3-4 days. For longer storage, wrap individual bars tightly in plastic wrap and then foil, then freeze for up to 1-2 months. Thaw in the refrigerator before serving.
In the symphony of fall desserts, pumpkin cheesecake bars stand out as a harmonious blend of classic flavors and modern convenience. They offer the luxurious experience of a rich, creamy cheesecake infused with the comforting essence of pumpkin spice, all packaged in a portable, shareable format. Whether you're a seasoned baker or just starting your culinary journey, these bars provide an approachable yet impressive option for any gathering. So, embrace the season, gather your ingredients, and prepare to delight your friends and family with these truly perfect pumpkin cheesecake bars – the ultimate fall gathering dessert.